Sign UP

Showing posts with label On the Grow. Show all posts

Friday, July 8, 2011

Flashback Friday!

Welcome back to another round of Flashback Friday! My apologies for the late posting, but with the kids out of school they are occupying a lot of my time...and giving me more laundry!!

Let's get started with Sketch # 20:


I chose Baja Breeze and Whisper White for this one. I have a few male customers, so this is going to one of them. Are you one of my customers who's placed an order in the last year? Do you want to be? One of the perks of being my customer is that I send out cards ALL. THE. TIME. So, if you're one of MY customers, look for a card in your mailbox!

The set I used is Uncharted Territory and I'm happy to report that it is still in the 2011-2012 Idea Book and Catalogue. Since The Open Sea didn't make it into the new Catalogue (there's always next year!), this will be my new go-to set for boats.

Sketch # 21:


As some of you know, I'm hosting my very first Stamp-a-Rama event in August! We'll be using the Playful Polka Dots Simply Scrappin' Kit. I designed and completed all the projects and still had LOTS of Paper left over from the kit, so I'm STILL using it!

I also used one of my FAVOURITE sentiments from the Smarty Pants Stamp Set.

Sketch # 22:


I created this one as a love not card (3x3) and I'll be giving it to some of my girlfriends over the weekend - shhhhh!

I used a greeting from the Happy Greetings Set which is in the Summer Mini (only available till August 30th) and MORE of the Designer Series Paper and cardstock from the Playful Polka Dots kit.

Sketch # 23:


I've been doing some custom work for a new client. Her save the date cards are quite unique and require a special folder. I designed one like a gift certificate holder with which she was quite pleased. This card is the same basic design and can be used to hold a gift certificate.  It's 3 7/8" x 8 1/2".

I used even MORE paper from the Playful Polka Dots Kit and a stamp from the Short and Sweet Set. The card is further embellished with the Scallop Trim Border Punch and some Daffodil Delight 3/8" Taffeta Ribbon.

Sketch # 24:


I just started taking John Sanpietro's Stamping Business Basics course and one of the first things we were to do was determine our OBJECTIVE for doing what we do. It couldn't be about the MONEY specifically, but we had to choose something to work toward to keep us motivated to keep working the business.

My daughter suggested world travel - pretty awesome since I've never left the North American continent. So, my FIRST objective is a trip to Paris. I've always wanted to have breakfast on the Champs Elysées, so this is my motivation!

I used images from the Artistic Etchings Set and a sentiment from On the Grow since it seemed PERFECT for this card.

Sketch # 25:


This one uses Fabulous Florets and paper from the Pocketful of Posies Pack. The colours I used remind of a paper called (I think) Tea Garden.  Everything old is NEW again!

I stamped the flowers for my background using Pear Pizzazz and Calypso Coral. Then I stamped my focal flowers using Pear Pizzazz, So Saffron and Calypso Coral.  LOVE this combination! The Calypso Coral flower was stamped three times and cut out to add dimension.

The sentiment I used is from the set You're a Gem, which was first in the Occasions Mini earlier this year and is now in the Idea Book and Catalogue.

Well, that's it for today! I have a BUSY weekend with my girlfriends and my downline planned, so I likely won't be back till it's time for MDS Monday.

Next Wednesday, I am heading to Boston to hang out with Brenda and Mary Anne as we have our own CONBRENTION!!! We couldn't go to Stampin' UP! convention this year, so the three of us are going to have our very own version.  Can't wait!!  Brenda says she even has pillow gifts for us - WOOT!

While there I will DEFINITELY be posting about all the fun and crazy things we're doing as well as posting about any news we hear from Convention.

Have a GREAT weekend and Happy Stampin'!

STAMPS: Short and Sweet, Uncharted Territory, Happy Greetings, Smarty Pants, Artistic Etchings, On the Grow, Fabulous Florets,  You're a Gem
INK: Baja Breeze, Old Olive, Melon Mambo, So Saffron, Soft Suede, Pear Pizzazz, Calypso Coral, Versamark
PAPERS: Baja Breeze, Old Olive, Melon Mambo, So Saffron, Soft Suede, Pear Pizzazz, Daffodil Delight, Pumpkin Pie, Whisper White
ACCESSORIES: Punches, Stampin Dimensionals, Big Shot, Dies, Ribbon

Wednesday, June 8, 2011

Watercolour Wednesday - On The Grow

Welcome back to Watercolour Wednesday! If you first visited last week when I linked the CCMC sketch, I'm glad you're back!  Be sure to visit the rest of my blog where you'll see LOTS of creations!

Today's card is a Sweet Sunday Sketch (#118) and a COMPLETE CASE of a card by the lovely and talented Vicki Burdick.


I just loved it SO much that I had to CASE it!  It's another one of those instances where one shouldn't mess with perfection. I even used the SAME paper, from the Love Letter Designer Series Paper pack. This paper is only available for a little bit longer as it will retire with the 2010-2011 Idea Book and Catalogue.

Here's a close up of the bow detail:


You'll be please to note that the 5/8" Black Satin Ribbon is NOT one of the retiring accessories. Good thing too because I really like it!

I hope you enjoyed today's version of Watercolour Wednesday. Do let me know what you think of today's card.  I'd LOVE to hear from you!

STAMPS: On the Grow
INK: Black Staz-On
PAPERS: Very Vanilla, Basic Black and Cherry Cobbler Cardstock; Love Letter DSP; Watercolour Paper
ACCESSORIES: Watercolour Crayons, Ribbon, Stampin' Dimensionals, Big Shot, Tasteful Trim Die, Basic Rhinestones


Happy Stampin'!

Tuesday, April 26, 2011

On the Grow - Part Two

This is my second post for today, so scroll down to see what else I've been doing.

I couldn't very well show you one image from this fun stamp set and not share the other, so you get TWO cards today - lucky you!

I found an older Viva la Verve sketch that I used for this card. I completely fell in love with all those layers! Here are some of the details:


Don't you just LOVE those brads? On a recent order, I added all the brads that are available in the colour collections and I'm so glad I did! The ones I used for this card are Pumpkin Pie from the Brights Collection. One of my FAVOURITE things about Stampin' UP! is that everything matches!  So, you don't need to worry that your "orange" brads won't be the same shade as your "orange" paper.  Simply select the same "orange" and you're good to go! Inks and markers match too!

I finished the inside of this card with some matching paper and the Scallop Trim Border Punch.

Here's a close up of the coloured image:


I used Wild Wasabi and Garden Green to colour the leaves. For the flowers, I used Tangerine Tango, Cajun Craze and a touch of Cherry Cobbler for the flower middles. On the vase/jar, I used a touch of Bashful Blue and really washed it out, so it looked close to clear. The background was done using Peach Parfait, again, really washed out.

But Christyne, you're thinking...there's no Peach Parfait Watercolour Crayon, how did you do that?

Watercolouring using ink from an ink pad:

  • While your ink pad is still closed, squeeze it a little bit.
  • When you open your ink pad, you'll notice a small deposit of colour in the lid.
  • Dip your Aqua Painter into ink on your lid and use this to colour your image.
  • Couldn't be easier!
Here's my completed card:


I think this will be the card I send to my MIL for Mother's Day. Now I just need to come up with one for MY mom!

What do you think?

STAMPS: On the Grow - Available May 1st!
INKS: Staz-On, Peach Parfait
PAPERS: Whisper White, Rose Red and Tangerine Tango Cardstock; Sweet and Sour Specialty DSP (each it is clear embossed on one side!); Watercolour Paper.
ACCESSORIES: Watercolour Crayons, Aqua Painters, Brads, Scallop Trim Border Punch, Stampin' Dimensionals

Happy Stampin'!

ATC Tuesday - On the Grow

I got On the Grow last week as part of my summer mini pre-order and couldn't wait to ink it up!  Of course, it just BEGS to be watercoloured, but then I would have had to wait till Watercolour Wednesday to showcase it. Since I just started a series last week, that would mean I'd have to wait till the middle of MAY to put this card up.  NO WAY!

So I decided to cheat a little and use if for ATC Tuesday this week.  You don't mind, right?

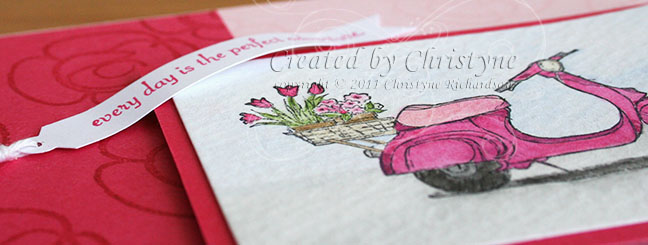
Here's the ATC portion of the card. I used a piece of our Watercolour Paper and trimmed it to 2 1/2 x 3 1/2". After I had it coloured, I decided that I wanted to add a border, so I trimmed it further to 2 1/4 x 3 1/4" so I could add a Melon Mambo mat making it ATC size (2 1/2 x 3 1/2"). 


This sentiment is SO. MUCH. FUN. And don't you just love the long banner? I got this FAB idea from Diana Gibbs for making a really long jewelry tag. Here's how you do it:

  • Cut your strip of paper to 3/8" wide. At this point, it doesn't matter how long it is.
  • Rather than just inserting it into the punch, flip the punch over and put one end into the punch going through the punch shape.
  • It will look like one end of the paper is through the punch and then you'll have a long tail sticking out.
  • Essentially what you're doing is just punching one end of paper. This creates your really LONG jewelry tag.
  • Stamp your sentiment up close to the "tag" end (where the little circle is) and then use your square punch (size really doesn't matter - LOL!) to punch out the "banner" end.
  • Embellish the tag as desired.  I took my 1/16" handheld punch and punched a hole in the little circle.  Then I tied a piece of Whisper White Baker's Twine through the hole.
  • Adhere to your card using glue dots.  If you bend it up just a bit, it looks even MORE like a little banner.
Here's the finished card:


I used Pink Pirouette for my base and Pink Pirouette again for my first layer stamped with Versamark using the Flower Fest Set from the Summer Mini. I added a partial layer of Melon Mambo also stamped with the same flower and Versamark Ink.

My focal image is adhered to the front of the card using Stampin' Dimensionals.

What do you think?

STAMPS: On the Grow, Flower Fest
INK: Staz-On, Versamark
PAPERS: Whisper White, Pink Pirouette and Melon Mambo Cardstock; Watercolour Paper
ACCESSORIES: Punches, Watercolour Crayons, Aqua Painters, Stampin' Dimensionals, Whisper White Baker's Twine

Don't forget to come back tomorrow for a look at week #2 in my "For Teacher" series.

Happy Stampin'!