Sign UP

Showing posts with label 3-D Goodness/Altered Items. Show all posts

Thursday, September 1, 2016

Have some tea 3-D Thursday

You may remember last week's post where I mentioned that I had misheard some directions for what I was creating and now it had to be for this week...well, it's this week! :)

Sam Hammond (AKA Pootles) over in the UK makes the most adorable little boxes for all KINDS of things and last week, she created the cutest little tea box for tea that comes in bags. As soon as I saw it, I just knew I had to recreate it. And then...I was sorting out some things for our trip to France (we're in Lyon till tomorrow) and came across a tea bag that I hadn't used from our last trip and it was the perfect fit!

Check it out:


I started off with a piece of Mint Macaron Cardstock that was 3 ¼" x 11" and scored it at 3 ½", 4 ¾", 8 ¼" and 9 ½". You can find all the directions on Sam's YouTube channel. I then went nuts with all the sponging ('cause sponging!) and added pieces of Blooms & Bliss Designer Series Paper, which were also sponged.


Then I created the little inserts (the correct size this time!) and sponged all over those too.


The flower closures are just BRILLIANT and I think I'll use Sam's idea in the future.


Basically, you put glue dots on only the two bottom petals of the flower, hold the flap down and adhere the flower in the correct spot. The flap then simply tucks under the top petal. See? Brilliant!

And here's the tea I found:


At time of writing, I was waiting for little magnets to arrive on a slow boat from China, so the top doesn't close securely yet. I'm hoping they'll be at home when we return tomorrow so I can finish it up.

What do you think?

STAMPS: None
INK: Mint Macaron (for sponging)
PAPERS: Mint Macaron Cardstock; Blooms & Bliss DSP
ACCESSORIES: Punch, Basic Rhinestones, Glue Dots, Sponges

Happy Stampin'!


Thursday, August 25, 2016

For You 3-D Thursday!

It's not *exactly* 3-D since it's still kinda flat, but it's not a card, so that's something...right? :)

Check this out:


These came about because I misheard the directions in a video for something you'll see next week. I was merrily creating along and when I had made them all, I realized that they were too big for the project I was *actually* working on. Now you'll have to wait for next week to see it - LOL!

I started off with a 5 ½ x 5 ½" piece of Blooms & Bliss Designer Series Paper (I'm almost out of the blue/green papers - good thing I have another pack on standby!) and created a gift card size envie using my Envelope Punch Board. Then I went a little NUTS with the sponging...it's pretty much EVERYWHERE!

For the belly band, I stamped on Whisper White Cardstock using the splatter stamp from Touches of Texture and Mint Macaron Ink (which I stamped off first) and then stamped the large flower image in Island Indigo. The sentiment is from Thoughtful Branches (which is only available for a few more days!)

I added some Basic Rhinestones, because you can never have too much bling!

What do you think?

STAMPS: Touches of Texture, Thoughtful Branches
INK: Mint Macaron and Island Indigo
PAPERS: Whisper White Cardstock; Blooms & Bliss DSP
ACCESSORIES: Envelope Punch Board, Punches, Basic Rhinestones, Stampin' Dimensionals

Happy Stampin'!

Product List

Links by TheseAreMyStamps.com

Thursday, August 18, 2016

Celebrate 3-D Thursday!

Have you heard of Craft Project Central? It's pretty awesome! It's a paid subscription, but TOTALLY worth it! You get 10 projects each month for just $10 and if you subscribe to at least two months in a row, you get a bonus project too! I don't buy the subscription *every* month, but when I do, I'm NEVER disappointed!

Today's project comes from July 2016 (yes, you can purchase back months) and I was SO thrilled with the way it turned out! Check it out:


It's a box set of five cards (but there's space in there for at least one more AND envelopes too! The box is created with two pieces of Dapper Denim and a piece of Smoky Slate Cardstock. And the stamped image panel is a belly band that comes off:


Of course, now that I'm looking at in an actual blog post, I'm wishing I'd stamped the lid/flap too. Not that you can see much of it when the belly band around it, but still. Does that ever happen to you? You create something, it's awesome, you take a picture and...you think of at least three different things you could have done to make it even MORE awesome! In the next version, I think I'll stamp the flap. :)

Would you like to see the cards on the inside??

I'll share one with you today and then you'll have to come back over the next week or so to see the rest. OK?


I love the way this card turned out! Unfortunately, the paper doily is retired (there's NEW ones that are even prettier, so don't despair!), but all the rest of the goodies I used can be ordered right HERE.

I started off with a base of Crushed Curry Cardstock cut to 5 ½ x 8 ½" and scored at 4 ¼". I stamped all over it using the flower from the Touches of Texture Stamp Set. Next, I attached the doily.

Then I got to work on the image panel. It was stamped & embossed with Gold Embossing Powder (you could use copper) and then stamped in Smoky Slate using the Gorgeous Grunge Stamp Set. I love using background/collage stamps because there's SO much you can create with all the images! Collage backgrounds are really "in" again this year, so these stamp sets should be on your must have lists.

The sentiment comes from the Watercolour Wishes Project Kit. This kit comes with EVERYTHING (except adhesive) to create 20 beautiful cards. Once you've created all the cards, you still have a beautiful stamp set that you can use over and over again!

The finishing touch was linen thread wrapped about the Whisper White Cardstock a couple of times and tied in a bow.

Here's the inside:


I stamped the long image from Touches of Texture and sponged the edges of the Whisper White Cardstock. And...like to box, I think it needs something "more". I think I'll doodle a design around the edge of the Whisper White panel.

What do you think??

STAMPS: Touches of Texture, Gorgeous Grunge, Watercolour Wishes
INK: Archival Black, Crushed Curry, Dapper Denim, Smoky Slate and Versamark Ink
PAPERS: Whisper White, Basic Black, Crushed Curry, Dapper Denim, Smoky Slate
ACCESSORIES: Embossing Powder, Heat Gun, Linen Thread, Stampin' Dimensionals

Happy Stampin'!

Thursday, August 11, 2016

Enjoy 3-D Thursday!

I don't know if you know this...but I knit!! I love it when I can combine my paper crafting with knitting - then all my hobbies are happy that they're getting attention - LOL!

I also work at our local (ish) yarn store in Georgetown. Georgetown Yarn is often my home away from home since it's such a fun place to be! They say if you love what you do, you'll never work a day in your life! How fortunate that both my "jobs" are so much fun! :)

Today, I'm sharing a little gift that I created for a friend. We've been super busy at Georgetown Yarn creating kits for upcoming shows (Kitchener Knitter's Fair and Woodstock Fleece Festival) and Lindsay has been our project manager. She's done a GREAT job and since she's a paper crafter and a knitter too, I just knew she'd love this (and I was right! I've already gifted it to her and she was THRILLED!)

Check it out:


This is the little bag before I put the yarn in it. I used a Bow Paper Clip to hold it closed. Bella was stamped in Archival Black Ink on Thick Whisper White Cardstock so I could use my Aqua Painter to colour her in.

The pretty skein of green yarn was too big to stuff inside the little box, so I just used the clip to hold Bella on the front of the box. See?


What do you think?

INK: Archival Black, Dapper Denim Ink, Soft Suede and Real Red Ink
PAPERS: Dapper Denim and Thick Whisper White Cardstock; By the Shore DSP
ACCESSORIES: Big Shot, Circle Framelits, Bow Paper Clip, Aqua Painter

Happy Stampin'!

Thursday, August 4, 2016

Oh Happy 3-D Thursday!

Oh Happy Day! Wait till you see this!


I had SO much fun creating this little box set yesterday! I knew when I saw it, that I'd have to sit down and make it RIGHT AWAY. And then, I knew I had to show you! :)


Can you guess what it is??


How adorable is that? I love making covered notepads and this one just makes me smile! I wasn't sure I would like the little fishy paper, but it's so cute. And it has a "not fishy" side so you can use it with cards that don't involve fish. I particularly like the striped design that you see above in the belly band.


And then there's these! Tiny little simple note cards (they're just 3 x 4!) that can be used for a quick note or to jot down a thought...maybe a quick card sketch for your next blog post?

And here's the full set:


There's an empty space there as I haven't been back to school shopping and that's where the pencils go.

I think I'll make a couple more and drop of them off for the secretaries at my youngest son's school. Might as well get on their good side from the start.

What do you think?

STAMPS: Scenic Sayings
INK: Calypso Coral
PAPERS: Very Vanilla, Crumb Cake and Dapper Denim Cardstock; By the Shore DSP
ACCESSORIES: Big Shot, Dies, Stitched Satin Ribbon, Stampin' Dimensionals

Happy Stampin'!

Thursday, January 15, 2015

The cutest little box - EVER!

Have you seen the little 2 x 2 boxes that are available in the Occasions Catalogue? They were in the Holiday Catalogue too and I'm SO pleased they carried over. I just love them!


This one was another one of the TWELVE projects we completed in my Birthday Bash Class this past Saturday. We did TEN cards and then two boxes - one of the boxes was big enough to hold almost all of the cards. :)

This box is SUPER tiny, so you'd have to have a tiny present to add to it - a pair of earrings perhaps? Or some really cute EOS lip balm?

We started off with the teeny box (of course) and added some Moonlight DSP on all four sides and to the top as well.

To make the box even CUTER (is that even POSSIBLE?) we added a bow to the top that we made with the bow builder punch, which is brand new in the Occasions Catalogue. If it's not yet on your wish list, you should probably remedy that situation pretty soon. :)

What do you think?

STAMPS: A Round Array
INK: Blackberry Bliss
PAPERS: Whisper White, Hello Honey and Blackberry Bliss Cardstock; Moonlight DSP
ACCESSORIES: Punches, Marker, Bakers Twine

Happy Stampin'!


Tuesday, March 27, 2012

A little Easter cuteness!

OK, so I've been talking about this on Facebook for like TWO days and TODAY you get to see the end result!

Here are only a few of the Easter treats:


I'm actually making 32 of them, but I promised my little man, Jonathan, that he could help me. He needs 19 for his class. The other 13 will be for spreading the love among mine and DD's friends. I asked my other DS if he wanted some, but being 13 he's too cool for these - LOL!

Here's a close up of the sentiment (Happy Easter from Teeny Tiny Wishes) with the "stem".


I found the tutorial on a fellow demonstrator's site and was THRILLED to be able to use up some of my 2010-2012 In Colour Designer Series Paper. I still have lots left over, but this little project put a pretty good dent in it! :)  I even managed to find enough Chocolate Chip scraps to complete the scalloped circles - AWESOME!

What do you think?

STAMPS: Teeny Tiny Wishes
INK: Early Espresso
PAPERS: Chocolate Chip and Whisper White Cardstock; Blushing Bride, Peach Parfait and Pear Pizzazz DSP
ACCESSORIES: Punches, Paper Crimper, Sticky Strip

Happy Stampin'!

Monday, February 13, 2012

Class Valentines - check!

I'm normally VERY organized, but January and the first part of February have been SO crazy that I am cutting it down to the wire!

These are the Valentine treats for Jonathan's class:


I started off with the 1 x 8 cello bags and one pencil, but that looked a little cheap, so I had to go out and buy MORE pencils so I could put two in each bag - MUCH better!

I cut 2 x 2 pieces of Real Red Cardstock and folded them in half, adhering them to the top of the bag using Sticky Strip. The opening of the bag is at the BOTTOM, so if I'm LUCKY, the kids won't destroy the tag and actually open from the bottom...meh...who am I kidding???

I punched out the hearts using the full heart punch and Pretty In Pink Designer Series Paper and stamped the little round image from P.S. I Love You afterward. They were adhered to the folded Real Red Cardstock with Snail Adhesive.

Congratulations to Cathy who won one of the cards that I made for the Gala on Saturday!!

I won't be able to give any of the treats I made away as there is JUST enough for Jonathan's class. I'm about to try and squeeze in the MOJO Monday, so you can have that one when it's done. :)

What do you think?

STAMPS: P.S. I love you
INK: Real Red
PAPERS: Real Red Cardstock; Pretty In Pink DSP
ACCESSORIES: Punch, Cello Bags

Happy Stampin'!

Thursday, September 8, 2011

3-D Thursday - Too cute for words!

Combine your two loves - CHOCOLATE and STAMPING! - when you make these adorable little gift boxes. These little nuggets should be making their appearance in bulk stores soon, but I have it on good authority (read: I checked!) that you can get them in the bulk section already in certain Loblaws stores.


The It's a Wrap Occasions and It's a Wrap Holidays are interchangeable and give you so many options! Choose from any one of our Textured Impressions Embossing Folders to add a little punch to your box!


STAMPS:
It's A Wrap Occasions

PAPERS:
Blushing Bride 8-1/2X11 Card Stock
Cherry Cobbler 12 X 12 Smooth Card Stock
Island Indigo 8-1/2 X 11 Card Stock
Lucky Limeade 8-1/2 X 11 Card Stock
More Mustard 12 X 12 Smooth Card Stock
Pool Party 8-1/2 X 11 Card Stock
Soft Suede 12 X 12 Smooth Card Stock
Whisper White 12 X 12 Smooth Card Stock

INKS:
2010 In Color Stampin Write Markers
2011 In Color Stampin Write Markers
Cherry Cobbler Stampin Write Marker
So Saffron Classic Stampin' Pad
Soft Suede Stampin Write Marker

ACCESSORIES:
Printed 2010 In Color Designer Brads
Big Shot Die-Cut Machine
Houndstooth Textured Impressions Embossing Folder Die
Matchbox Stampin' Up! Bigz Xl Die
Neutrals 5/16 Inch Brads
Perfect Polka Dots Textured Impressions Embossing Folder Die
Petals-A-Plenty Textured Impressions Embossing Folder Die
Square Lattice Textured Impressions Embossing Folder Die
Stripes Textured Impressions Embossing Folder Die
Vintage Wallpaper Textured Impressions Embossing Folder

Wednesday, February 2, 2011

Life is a matter of moments

I may have mentioned before that when I first saw Elements of Style, I pretty much turned my nose up at it.  Vintage?  SO not for me! Or so I thought...
5" X 5" Art Journal

Turns out I like vintage - A LOT! So, when I saw this altered art journal on the Stampin' UP! site, I knew I had to make one for myself!  I haven't ordered the journal yet, but you can be sure that it'll be on my next order! I just LOVE the way this journal has been decorated!

Do you know how to get the paper all the way to the EDGE through the rings?  Easy peasy!  Just order the Spiral Punch along with all the supplies and you'll be good to go!

Want to see what I do with my journal when I get it?  Sign up for my newsletter and I'll share it with you in my next semi-monthly newsletter.  You can also shop for all the products you need to create your OWN altered art journal by clicking on the scalloped circle just above my newsletter sign up box.

Happy Stampin'!

Tuesday, December 7, 2010

3-D Thursday...on a TUESDAY???


I was planning on putting up an ATC today, but time crunches being what they are... well... that didn't happen!!!

Today we are headed down to the Hospital for Sick Children for some appointments and since it's nearly Christmas, I decided to take some treats down for the special people in our lives at the hospital.

This is the Ghirardelli Chocolate Box repurposed to hold Rocky Road Bars - YUMMY!!!

I stamped the image from Tags til' Christmas (which is available in the Holiday Mini, but only till December 31st) in Real Red on Whisper White Cardstock. I punched it out using the 1" punch my secret sister gave me (if you're reading, thanks Deb!!!) and then matted it on Pink Pirouette, which I hand cut. The final layer is a punched piece of Whisper White which was punched using the Scallop Square Punch.


What do you think?

INK: Real Red
PAPERS: Whisper White and Pink Pirouette Cardstock; Candy Cane Christmas DSP

Happy Stampin'!

Thursday, October 14, 2010

3-D Thursday - Gift Bags


We all make our own cards, right? So why go out and get a store bought gift bag? Why not make your own???

Recently, DS attended a birthday party for a friend of his. I had the card all sorted out - thank goodness for Extreme Elements and Grunge Rock - but I needed a bag too. As mentioned in yesterday's post, I'll be at the Creativ Festival with my Caroline next weekend (this weekend I'm prepping for VEGAS BABY!!!) and I'll have some hand made items for sale. In order to get ready for that, I bought some Kraft coloured bags to decorate. I just pulled one out of that stash and went to work.

Here's what I came up with:

I used Party This Way on the outside of the bag. The Extreme Elements are Grunge Rock were reserved for the card (sorry, no pic of that).

Here's a sneak peek of another bag I made...


To see the whole thing, you'll have to be a demonstrator and click on the link up to the left in order to join SUDSOL as a trial member as the above sample is exclusive to SUDSOL.

Happy Stampin'!

Sunday, October 3, 2010

Design-A-House


Design-A-House


Stamp Sets
  • Bells & Boughs
  • Welcome Christmas
Paper
  • Card stock: Confetti White, Always Artichoke Textured, Cherry Cobbler Textured, Early Espresso Textured
  • Deck the Halls Designer Series Paper
  • Newsprint Designer Series Paper
Ink
  • Early Espresso Classic Stampin' Pad
  • Distressing Essentials
  • Frost White Shimmer Paint
Accessories
  • Champagne Glass Glitter
  • Victoria 5/8" Crochet Trim
  • Always Artichoke 1/2" Seam Binding
  • Antique Brads
  • Neutrals Designer Buttons
  • Deck the Halls Big Designer Buttons
  • Décor Accents Design-a-House
  • Deck the Halls Designer Fabric
  • Pewter Jumbo Eyelets
  • Pearls Basic Jewels
  • Mini Vintage Tags
  • Vintage Trinkets
  • Stampin' Dimensionals
  • Curly Label Punch
  • Decorative Label Punch
  • Dotted Scallop Ribbon Border Punch
  • Big Shot
  • Merry Details Sizzlits Die
  • Cream crochet thread

Thursday, August 26, 2010

3-D Thursday - Sunny Garden Box


Today's 3-D Thursday is a whole set of goodness! Four cards and a box in which to put them.

Here's the closed box:
Now, I did add an image matted on some punched pieces after I took the picture. I don't really like it, so I think I need to change the colours up or something...

Here's the box open:
I just used a length of Poppy Parade Ribbon to tie it closed. It acts sort of like a belly band.

Here are the cards:
There are four cards in the box, 2 of each design. I'm just LOVING this new Sunny Garden DSP!

Here's the envie:

If I've learned ANYTHING from my Caroline, it's that there should NEVER be a NAKED ENVIE!

What do you think?

STAMPS: Flower Fancy
INKS: Cajun Craze, Poppy Parade, Peach Parfait, Tangerine Tango, Pear Pizzazz, Garden Green
PAPERS: Whisper White, Peach Parfait, Pear Pizzazz and Poppy Parade Cardstock; Sunny Garden DSP
ACCESSORIES: Markers, Ribbon

Happy Stampin'!

Thursday, August 5, 2010

3-D Thursday - Newsprint and Butterflies


OK, first - YIKES! Where does the time go??? My plan was to set this to post automatically this morning, but yesterday got away from me, so it's here, but not as early as I'd like it to be.

Second - I KNOW you're getting sick of looking at this Newsprint Paper and I have good news for you there! I have new paper on the way - WOOT!!!

Now, on to today's 3-D project:

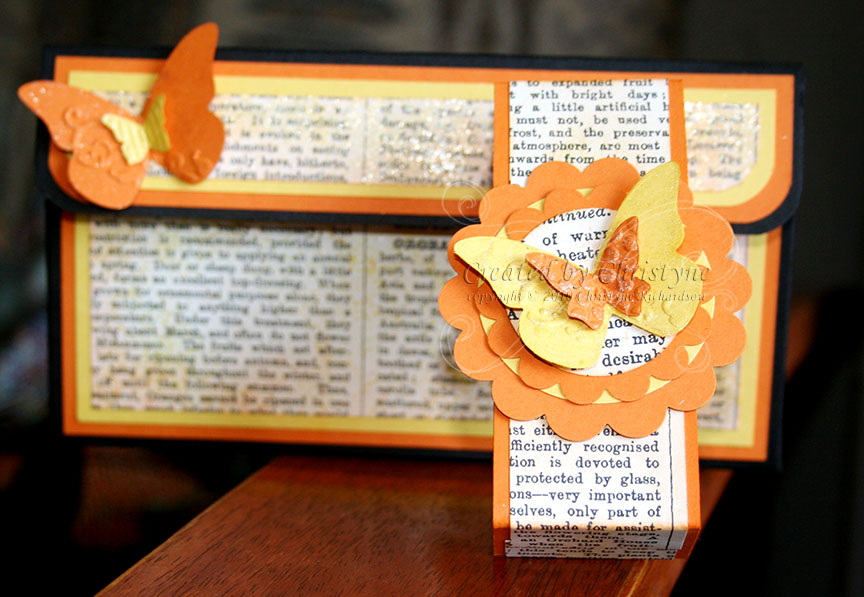
During my surfing this week, I came across this box, but it was a paid tutorial that I thought I could figure out for myself, so I did!!! My base is Basic Black Cardstock and I added the Newsprint DSP to the front panels. I'm part of a "Grab Bag" swap over on Split Coast Stampers and every month, I receive cards from other stampers. July was my month to "host", which means I send out packages of goodness to the three other participants in the group and they in turn create cards with the goodness that I send. One of the participants sent me a card using the Newsprint DSP that I sent and combined it with Orange and Yellow. Not a bad combination, so I used it on my box.

I punched out bits and pieces in Pumpkin Pie and Daffodil Delight to accent the box and if you look REALLY closely, you'll see that I used some Champagne Mist Ink to add some pizzazz. The finishing touch was a belly band.

What do you think?

STAMPS: None
INK: Champagne Mist, Pumpkin Pie
PAPERS: Basic Black, Daffodil Delight and Pumpkin Pie Cardstock; Newsprint DSP
ACCESSORIES: Punches, Big Shot, Dies

Happy Stampin'!

Thursday, July 29, 2010

3-D Thursday - Vintage Box


Welcome to another 3-D Thursday!

This week, I've created another box for you, as well as a card to go inside!

For the box, I followed the tutorial you can find here on Makeesha's blog. You HAVE to listen to/watch the video - her voice is just DARLING!


There is a bit of tweaking that needs to be done with her measurements though. When she says that you need to measure 4 1/2 inches from the first score line - DON'T! The actual measurement is 3 3/4" from the first score line, then 1 1/2" from there. If you score at 4 1/2" you won't get a box.

Also, with some additional tweaking of the instructions, you could EASILY turn this into a box that will hold A2 cards. With these dimensions, it will easily hold quite a few 3 X 6 cards and envies.

Here's the card I made:
I PROMISE you, it's not crooked IRL. The way the newsprint DSP was printed makes it look that way.

What do you think?

STAMPS: Elements of Style and Cute by the Inch
INK: Cherry Cobbler
PAPERS: Very Vanilla, Basic Black and Cherry Cobbler Cardstock; Newsprint DSP
ACCESSORIES: Vanilla Hodgepodge Hardware, Ribbon, Punches

Happy Stampin'!

Thursday, July 22, 2010

3-D Thursday


It seems that whenever I post something on my blog, I jinx myself and then whatever I've said, doesn't happen. *sigh*

Well, I'm going to cross all my parts and hope that I can continue with the plan I've started. So far, I've managed to post every day (and then some!) in July and have kept up with my Sunny Sunday Sketch, so maybe this is a sign of things to come - like every day posting, ALL THE TIME!

With that said, welcome to what I hope is the first of many "3-D Thursday" posts. My hope is that I can continue to bring you a cute little 3-D project every Thursday. I hope you'll come visit every week!

This week, I'm bringing you a little project that I found while surfing around one day. The original box was made to hold the individual packets of M&M's and the designer was kind enough to provide the dimensions to adapt the box to hold 3 X 3 note cards and envies. Of course, I can't for the life of me remember WHERE I saw the box, so if you know, PLEASE let me know so I can give proper credit. Thanks!

So, I used the template to create these adorable little boxes for my SCS girls when we went out to dinner on Monday night.

SERIOUSLY? How cute are these? I used Prima Flowers for the front because I didn't have any appropriate sized flowers for the little closure. In the post where I found these little gems, the creator used a ribbon closure by punching holes in the box and the flap, threading the ribbon through the holes and tying a bow. Equally as cute as my flowers! Since I wasn't using the ribbon, I used 1/2 of a velcro dot to close my little boxes.

Inside the boxes, I included three little 3 X 3 note cards:

I started off with a Whisper White Base and added a piece of retired Rose Red DSP. I stamped the three images from Priceless in Rose Red (note to self: order Rose Red Re-inker) on Whisper White and punched them out using my 1 3/8" square punch.

What do you think?

STAMPS: Priceless
INK: Rose Red
PAPERS: Whisper White and Rose Red Cardstock; Rose Red DSP (retired)
ACCESSORIES: Prima Flowers, Chocolate Chip Brads (retired)

Happy Stampin'!

Monday, June 28, 2010

More Teacher Gifts

Today I delivered the purses to Jonathan's school and finished up the gifts for Colin's school. Here's what the teachers and secretaries will be receiving:
The little boxes were made with Kiwi Kiss and Pink Pirouette Cardstock. They were accented using Raspberry Tart DSP.

Each of the candles was hand stamped using Rose Red Ink and stamps from the Elements of Style stamp set which is available in both clear mount and wood mount in the Summer Mini:


And each of the boxes come with a matching little note card:

What do you think?

STAMPS: Elements of Style
INK: Rose Red
PAPERS: Whisper White, Pink Pirouette and Kiwi Kiss (retired) Cardstock; Raspberry Tart DSP (retired)
ACCESSORIES: Scallop Oval Punch

Happy Stampin'!

Tuesday, June 22, 2010

It's that time of year again!

The kids are finishing up school. With just one more week to go, I knew I had to get my butt in gear and get some gifts made! Becky Roberts to the rescue!!! If you haven't seen her blog, you have to check it out! She has the most amazing tutorials and they are reasonably priced. I just love her work!!!

This year, the teachers will be receiving Becky's Purse-onally Perfect cards and purse:
This purse uses retired product. I'm trying to use it up to make room for the new stuff!!! I used the Floral Fusion Sizzlet to add the flower to the flap of the small front pocket.

I created the purse using Kiwi Kiss Cardstock as well as Bella Rose and Raspberry Tart DSP. The cards are also made from Kiwi Kiss Cardstock and also use Bella Rose and Raspberry Tart DSP. I used the new Level 1 Hostess Set which will be available with a qualifying purchase on July 1st when the new Idea Book and Catalog launches. The set is called Because I Care.

I inked up the image with Kiwi Kiss and Pink Pirouette Inks. Then I used my Ruby Red marker to add some red to the floral image. I used a sponge and Riding Hood Red ink to add a bit of colour to the edges of the image panel.

The sentiments on the front of the card are from the Watercolour Trio stamp set which is available in the Summer Mini (in both clear and wood mount). Because I misplaced my Riding Hood Red Stampin' Spot, I used my Ruby Red Marker and coloured directly on the sentiment before stamping it on Whisper White Cardstock and punching it out with my large oval punch. The sentiment was matted on a piece of Riding Hood Red Cardstock punched with my scallop oval and then adhered to the front of the card using Stampin' Dimensionals.

What do you think?

STAMPS: Because I Care, Watercolour Trio
INKS: Pink Pirouette, Riding Hood Red, Kiwi Kiss
PAPERS: Whisper White, Kiwi Kiss and Riding Hood Red Cardstock; Bella Rose and Raspberry Tart DSP
ACCESSORIES: Punches, Stampin' Dimensionals, Big Shot, Brads

Happy Stampin'!