 Yep! I'm serious...BY HAND!!! Aren't they just adorable! I can't wait to use them on some cards! Those snowflakes? They sparkle! You can't tell in the pic, but they have tiny little sparkly threads in them. Oh I sure do love these girls!
Sunday, October 4, 2009
Itty Bitty Flowers
OH. MY. GOSH. Ina made these:
 Yep! I'm serious...BY HAND!!! Aren't they just adorable! I can't wait to use them on some cards! Those snowflakes? They sparkle! You can't tell in the pic, but they have tiny little sparkly threads in them. Oh I sure do love these girls!

Saturday, October 3, 2009
A card box
Diana is just as awesome as Teresa!!! She made everyone this amazing little purse/box that holds cards. Can you imagine? How cute is this?
 It's a good thing she gave us directions, because my DD was about ready to swipe mine! Now...I can make her one of her own!
 It's a good thing she gave us directions, because my DD was about ready to swipe mine! Now...I can make her one of her own!
Friday, October 2, 2009
Peach Jam on Toast
You've heard me talk about my SplitCoast friends before...we get together (once a month now!) and just chat, eat, enjoy each others company...it's a beautiful thing!
We got together this past Tuesday at Big Daddy's Crabshack in Mississauga and had a great time! We brought goodies so that we could spoil each other which is just another reason we enjoy getting together - Christmas once a month!!!
 Teresa brought us all her AWARD WINNING Peach Jam and let me tell you! It is heavenly. I had to put it on toast the very next morning.
 Lucky me!!!
Thursday, October 1, 2009
A little more Cheep Talk
I'm participating in a Fancy Fold Swap over on SplitCoast Stampers. Are you? If not, you should be!!! I've seen some of the cards and they ROCK! There's still time to join and I'm sure Diana would LOVE to have you. It's Canadian based, but if you're reading from the US, don't let that deter you...we're very accommodating up here in Canada and I'm sure we can work something out for postage.
So...This is a Z-Fold Card. To make it, you take a piece of cardstock that is 4 1/4 X 11 inches and fold it in half at the 5 1/2" mark. Then, take the front of the card and fold it back on itself so that the edge meets up with the first fold. Then...embellish! Easy, right?
 I used the Cheep Talk set again and inked up the branch in Close to Cocoa and the leaves in Old Olive. The day I made these, I was stamping with some girlfriends and didn't bring my markers - d'oh! Good thing I had some Stampin' Spots with me...they did the trick quite nicely!
My card base is Rose Red (oh, how I LOVE this colour!!!) and the DSP is Rose Red too (of course!). The image is stamped on Whisper White and matted on (you guessed it!) Rose Red! I didn't take a pic of the inside of the card, but I added a piece of Whisper White that will fit under the image panel with the card is closed. For a finishing touch, I added a piece of Whisper White Taffeta Ribbon tied (once again) using my non-dominant hand to achieve the perfect bow.
What do you think?
STAMPS: Cheep Talk
PAPERS: Whisper White and Rose Red Cardstock; Rose Red DSP
INKS: Rose Red, Close to Cocoa, Old Olive
ACCESSORIES: Ribbon
Happy Stampin'!
Monday, September 28, 2009
Cheep Talk
This set is just so stinkin' cute! You just HAVE to have it! I know some friends who are in love with bird stamps...bet they just adore this!!!

 I use Old Olive for the base of both of these cards. They also use Rich Razzleberry (a 2009-2010 In Colour) and Cottage Wall Designer Series Paper (a new addition to the 2009-2010 Idea Book and Catalog).
When I stamped the sentiment on the top card, I got a little smudge and so covered up with the Modern Label and Word Window punches with the addition of a circle image. I think the Modern Label and Word Window punches kind of makes it look like a clip of some sort. Must remember to do that again - LOL!
On the bottom card, I punched out a piece of the Cottage Wall DSP with the butterfly and used that as an accent piece.
What do you think?
STAMPS: Cheep Talk
PAPERS: Whisper White, Old Olive and Rich Razzleberry Cardstock; Cottage Wall DSP
INKS: Close to Cocoa, Old Olive, Rich Razzleberry
ACCESSORIES: Old Olive Ribbon, Punches
Happy Stampin'!
Friday, September 25, 2009
More for a New Little One
Here a couple more cards along the same lines as the one shared yesterday:
 This one uses a Baja Breeze base with a layer of Kraft under the DSP.
 This one uses a Very Vanilla Base with a layer of Baja Breeze under the DSP.
What do you think?
STAMPS: Everything Nice
PAPERS: Very Vanilla, Baja Breeze and Kraft Cardstock; Manchester DSP
INK: Baja Breeze
Happy Stampin'!
 This one uses a Baja Breeze base with a layer of Kraft under the DSP.
 This one uses a Very Vanilla Base with a layer of Baja Breeze under the DSP.
What do you think?
STAMPS: Everything Nice
PAPERS: Very Vanilla, Baja Breeze and Kraft Cardstock; Manchester DSP
INK: Baja Breeze
Happy Stampin'!
Thursday, September 24, 2009
To Welcome a New Little One
NO! I don't have a new little one (or even one on the way for that matter!), but you might have...or know someone who does...and these would be perfect!
These, once again, use the "Everything Nice" stamp set - these days, it's my fave!!!
 The base on this one is Kraft with a layer of Always Artichoke before the DSP. I also used Very Vanilla and Baja Breeze (retired).
 The base on this one is Chocolate Chip Cardstock with a layer of Very Vanilla under the DSP. I also used Kraft and Baja Breeze on this one too.
 This base is also Chocolate Chip with a layer of Very Vanilla under the DSP. No Kraft on this one, but I did use Baja Breeze. I think this is my fave - I just LOVE that ribbon!
What do you think?
STAMPS: Everything Nice
PAPERS: Very Vanilla, Kraft, Baja Breeze (retired), Always Artichoke and Chocolate Chip Cardstock; Manchester DSP (retired)
INK: Baja Breeze (retired)
ACCESSORIES: Twill, Ribbon
Happy Stampin'!
Monday, September 21, 2009
The "Boy" versions
So...a couple weeks ago, I went on a card making frenzy! I got 21 (more or less) cards done in two days. For the past week, I've been showcasing the "girl" cards. This week, I'll share some of the "boy" cards.
These cards again use "Everything Nice" which is SO versatile! You really must add it to your collection! Ask me...I'll get it ordered for you - no problem!
 This one uses a Very Vanilla Card Base.
 This one uses an Always Artichoke Card Base.
 This one uses an Always Artichoke card base too.
 This one uses a Chocolate Chip base.
What do you think?
STAMPS: Everything Nice
INK: Baja Breeze (retired), Always Artichoke, Chocolate Chip
PAPERS: Baja Breeze (retired), Always Artichoke, Kraft, Chocolate Chip and Very Vanilla Cardstock; Manchester DSP (retired)
ACCESSORIES: Twill
Happy Stampin'
Friday, September 18, 2009
Sugar and Spice
Here are a couple more of the cards that I created during my last card making frenzy!
These ones again use a stamp from the Everything Nice set and again use Bella Rose and Raspberry Tart Designer Series Paper.
 This card uses a Rose Red base.
 This card uses a Pink Pirouette base.
What do you think?
STAMPS: Everything Nice
INK: Rose Red
PAPERS: Whisper White, Pink Pirouette and Rose Red Cardstock; Bella Rose and Raspberry Tart Designer Series Paper.
ACCESSORIES: Ribbon
Happy Stampin'!
Thursday, September 17, 2009
To Have and To Hold - Different Versions
These were the cards that I actually started with when I went on that card making frenzy almost 2 weeks ago. I was cleaning out my "scrap bag" (where the scraps go as I am making cards) and realized that I had an awful lot of Manchester DSP hanging out in there. I LOVE Manchester DSP, but unfortunately, it's retired - *sigh* Good thing I like lots of the new DSP that goes with the NEW In Colours!
These are a couple of other versions of the card I showed yesterday. Same stamp, different paper!
 This card uses a Baja Breeze base (Baja Breeze was my FAVOURITE of the retiring In Colours, and I was VERY sad to see it go!)
 This card uses a Chocolate Chip base.
What do you think?
STAMPS: Everything Nice
INK: Baja Breeze
PAPERS: Very Vanilla, Kraft, Baja Breeze and Chocolate Chip Cardstock; Manchester Designer Series Paper
ACCESSORIES: Very Vanilla Ribbon
Happy Stampin'!
Wednesday, September 16, 2009
To Have and To Hold
This is the final card in what I called my "girl series" when I went on that stamping frenzy. It's funny, because I chose the last set of cards to showcase first - LOL! I actually started off making "boy" cards because I had a bunch of Manchester (also retired) scraps in my "scrap bag" (where I toss leftover bits after making a card). No worries though, I'll be posting those too over the next few days.
This card, again, features one of my favourite papers from the Bella Rose, the toile paper.
 I stamped the sentiment in Rose Red on Whisper White Cardstock and matted on a piece of DSP from the Bella Rose Collection. The card base is Pink Pirouette with a layer of Whisper White and then a layer of the Rose Toile from the Bella Rose Collection. The finishing touch is a perfectly tied Whisper White Taffeta Bow.
Do you know the secret to a perfect bow? Come closer...closer...you have to tie it with your non dominant hand! I kid you not...one day last week, I had to tie a bow on a card and the way I had the ribbon set up, it necessitated tying a left handed bow (I'm right handed). It worked! So...I tried it again! And it worked again!!! So, if you normally make the loop with your left hand and send the rabbit round the tree with your right hand, try it the other way around and let me know your results!
What do you think?
STAMPS: Everything Nice
INK: Rose Red
PAPERS: Whisper White and Pink Pirouette Cardstock; Bella Rose Designer Series Paper
ACCESSORIES: Ribbon
Happy Stampin'!
Tuesday, September 15, 2009
CELEBRATE!!!
About a week ago, I went on a card making frenzy! I got 14 cards done on one day and another 7 done on a second day. Crazy I know...but when the mojo strikes, you've got to go with the flow! Fortunately, my DH is pretty understanding about these creating frenzies! LOL!
These are from the second day of creating:
 This card uses a Riding Hood Red base.
 This card uses a Kiwi Kiss Base.
 This card uses a Whisper White base.
 This card uses a Rose Red base.
The stamp is from the set Everything Nice which is INCREDIBLY versatile!
The DSP is retired, but since I bought it, I figured I might as well use it! There is Raspberry Tart and Bella Rose used on these cards. I think (and don't quote me on it!) that if you are reading from Australia and/or New Zealand that you may just be able to still get your hands on this!
My favourite is the last one - that toile looking paper just gets me every time!
What do you think:
STAMPS: Everything Nice
INK: Rose Red
PAPERS: Whisper White, Riding Hood Red, Kiwi Kiss and Pink Pirouette Cardstock; Bella Rose and Raspberry Tart Designer Series Paper.
ACCESSORIES: Whisper White Taffeta Ribbon
Happy Stampin'!
Monday, September 14, 2009
Teeny Tiny Bella Bleu Box and Cards
A little while ago, (O.K., it was a LONG while ago, but we're all hoarders - LOL!) I picked up these little cardboard boxes at a certain craft chain. Of course, I wasn't quite sure at the time what the heck I was going to do with them, but...well, you know how that goes!
Anyway, the other day I got this idea to cover one and make some teeny tiny note cards to put on the inside!
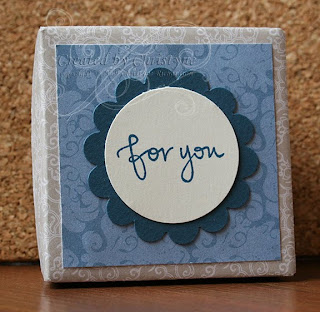
The box is covered in Bella Bleu Designer Series Paper and a second piece is added to the lid for contrast. The sentiment is stamped in Not Quite Navy on Very Vanilla Cardstock and punched out with the 1 3/8". It was then matted on a piece of Not Quite Navy punched out with the Scalloped Circle Punch.

The cards are Kraft Cardstock cut to 2 X 4 inches and folded in half. The sentiment was stamped on Very Vanilla in Not Quite Navy and punched out with my 1 3/8" square punch before being adhered to the front of the card. There are four cards in the box.
What do you think?
STAMPS: Great Friend
INK: Not Quite Navy
PAPERS: Very Vanilla, Kraft and Not Quite Navy Cardstock; Bella Bleu Designer Series Paper
ACCESSORIES: Punches
Anyway, the other day I got this idea to cover one and make some teeny tiny note cards to put on the inside!

The box is covered in Bella Bleu Designer Series Paper and a second piece is added to the lid for contrast. The sentiment is stamped in Not Quite Navy on Very Vanilla Cardstock and punched out with the 1 3/8". It was then matted on a piece of Not Quite Navy punched out with the Scalloped Circle Punch.

The cards are Kraft Cardstock cut to 2 X 4 inches and folded in half. The sentiment was stamped on Very Vanilla in Not Quite Navy and punched out with my 1 3/8" square punch before being adhered to the front of the card. There are four cards in the box.
What do you think?
STAMPS: Great Friend
INK: Not Quite Navy
PAPERS: Very Vanilla, Kraft and Not Quite Navy Cardstock; Bella Bleu Designer Series Paper
ACCESSORIES: Punches
Sunday, September 13, 2009
Clean and Simple
You should see my upline's inspiration wall! It's AWESOME and it's the place where she puts all the cards fronts she receives in swaps. There's so much to look at and everytime I look at it, I see something new that I'm sure wasn't there before (it probably was, but I'm getting old you know - LOL!)
Anyway, I saw a card similar to the one below a few days ago and just HAD to CASE it. Fortunately, my upline is great about letting me steal...err....borrow the stamp sets that she owns, so I borrowed Sweet Stems from her in order to stamp the card.
 The first thing I did was use my Scallop Circle Punch to punch out a template which I then used to create the lightly coloured scalloped circle in the middle of the card.
Then I inked up my stamp and stamped the image directly on top of the circle, leaving a little bit of the stem hanging down.
Lastly I tied a piece of Rose Red Ribbon around the card and called it done! Clean and Simple at it's best!
What do you think?
STAMPS: Sweet Stems
INK: Rose Red
PAPERS: Whisper White Cardstock
ACCESSORIES: Ribbon, Punch
Happy Stampin'!
Monday, September 7, 2009
Inspired by a Card Swap
This year, my Caroline didn't go to convention, but one of her downline did and Caroline sent some card fronts with her so she could swap them out. Caroline got some AWESOME card fronts which she'll use to display on her sample boards in her studio.
I just HAD to case one and it came out perfect! As an added bonus, it's pretty darn close to Lady Rebekka's sketch and I'm calling that one complete!
 I used Old Olive, Really Rust and More Mustard markers to colour the stamp and then huffed and puffed and stamped the image on Whisper White. I coloured the other side of the double mounted stamp (just the grass) in Old Olive and stamped it directly on top of the first image.
The image was the matted on Really Rust and More Mustard Cardstock before being adhered to Kraft Cardstock Base.
What do you think?
STAMPS: Inspired by Nature
INK: Old Olive, Really Rust, More Mustard
PAPER: Whisper White, More Mustard, Really Rust, Kraft
ACCESSORIES: Ribbon (used on the inside of the card)
Happy Stampin'!
Friday, September 4, 2009
The little box that goes with the 3 X 3 notes
While I was creating the tiny little note cards using Kristin's sketch, I decided that a little box would be just the thing to hold them. I got the template from Andrea Walford and it was SUPER easy to make!

And here's a picture of the open box and card together:

Happy Stampin'!

And here's a picture of the open box and card together:

Happy Stampin'!
Monday, August 31, 2009
Happy Anniversary!
I got up early this morning to put the finishing touches on the anniversary card for my hubby. We're celebrating 18 years today!!!
When I came out into the living room, this is what I found:
 Jonathan occasionally sleeps on the couch just because he can - LOL! I don't know if one of them was lonely in the middle of the night or what. When I came out, I noticed that the door to Colin's room was open, so I was expecting to see him sitting up reading...nope! There he was sleeping next to his brother on the couch - Heehee! Of course...I had to take a picture! What kind of self-respecting mom and scrapbooker would miss an opportunity like that?
This is the card that I was finishing up for my hubby:
 I started it when I was working with Caroline a couple of weeks ago and it was all I could do not to show it to DH right away - I love seeing his reaction when I make something really cool! But...I managed to keep it a secret and all I had to do today was write the mushy stuff on the inside. When you open it up, three cherries line up and you get the "jackpot".
Please DON'T ask me for directions/instructions on how to make this because it is INSANELY complicated! If you want to learn how to make it, you'll have to take a class with Caroline!
Hope everyone has a stamping good day!
Sunday, August 30, 2009
Lady Kristin's Sketch
This card is teeny tiny! It's only 3 X 3 and it's a variation on Lady Kristin's Sketch, which you can find here. It seems that my sketch challenge was quite the...ummm...challenge - LOL! Kristin had a bit of an issue with her sketch working the way she wanted it to and let us know in her post that the red stripe was supposed to go all the way across the card. I decided it should be ribbon, so that's what I used!
 While I had my upline's Sage Shadow ink in my possession, I decided to make use of it, so I stamped off the center flower on scrap paper first and then stamped it on Whisper White Cardstock. I then stamped the flower outline at full strength over the center flower. I punched the flower out using my 1 1/4" circle punch and then matted it on a piece of Pale Plum punched with my Scallop Square Punch. The main image panel is popped up on dimensionals for added interest.
The card base is a 6 X 3" piece of Pale Plum folded in half and the next layer is a 2 3/4" square piece around which I wrapped a piece of 3/8" Whisper White Taffeta Ribbon before adhering it to the front of the card.
What do you think?
STAMPS: Simply Said
INK: Sage Shadow and Pretty In Pink (used for edges of circle)
PAPER: Whisper White, Pale Plum, Perfect Plum
ACCESSORIES: Punches, Ribbon, Dimensionals
Happy Stampin'!
Thursday, August 27, 2009
This is hand made - thank you very much!!!
One of the topics of discussion that came up last night is the fact that certain people just don't appreciate the time, effort and love that goes into making the cards that we do. They get read and discarded without a second thought. Sad, but true...
Today I was doing my blog hopping and on my friend Kirstin's blog, found this blog entry. You should check it out...read it all the way through and check out the sentiment that is going on the back of one of her cards - it's perfect!!!
Happy Stampin'!
Today I was doing my blog hopping and on my friend Kirstin's blog, found this blog entry. You should check it out...read it all the way through and check out the sentiment that is going on the back of one of her cards - it's perfect!!!
Happy Stampin'!
Sugar, Coffee and Stamps
What a combination!!!
Yesterday was a bit of a crazy day for me as I had a lot of errands to run and also had to go for a pelvic ultrasound and a mammogram (yes, all in one day!).
A couple days ago, a few of us on SplitCoast Stampers arranged to meet for dessert and coffee - what a perfect reward after a crazy day!
So, last night I had the pleasure of meeting three lovely ladies from the SplitCoast Stampers site - what a blast!!!
 We talked, we laughed, we ate WAY too much sugar and ingested enough caffeine to probably keep us up all night stamping - LOL! Good thing I was drinking decaf - YIKES! I think our poor waitress was going a little nuts trying to get rid of us as there was a HUGE lineup at the door and we just weren't leaving! We spent three hours having the BEST time!
I met Karen, Diana and Teresa. Teresa is hosting the swap for which I made this card. I made another card too, but it's a secret for now. There's still time to join by the way...everything is sure to be AMAZING!!!
As we were firming up plans, I decided to create this card to give to my new stamping friends:
 I stamped the butterfly from the Great Friend stamp set in Soft Suede by stamping off first and then stamping on Very Vanilla. I matted it on Soft Suede and then again on Sahara Sand. The card base is Sahara Sand and the next layer is Soft Suede. The bottom strip is Very Vanilla on which I stamped the sentiment.
I've seen my other friend Karen use this squishy ribbon treatment before and I just LOVE it, so I decided it would be perfect for this card. Wouldn't you agree? I'm in love with the Vanilla Hodgepodge Hardware!
What do you think:
STAMPS: Great Friend
INK: Soft Suede
PAPERS: Very Vanilla, Soft Suede, Sahara Sand
ACCESSORIES: Circle Scissor, 3/4" twill, Styled Vanilla Hodgepodge Hardware
Happy Stampin'!
Subscribe to:
Posts (Atom)